
One of the things I do to learn more about photography is to read other photographers blogs. I have noticed that several of them post before and after pictures of their images. I think it is a good idea. Because it gives my clients an opportunity to see an image before I work some magic in photoshop to make it look it's best.
I have considered doing a few before and after posts for awhile now. The purpose behind these posts will be to help my customers understand that taking the pictures is only half of the process of hiring a custom photographer. When I get together with a family to take their pictures my job is only half way done.
I have considered doing a few before and after posts for awhile now. The purpose behind these posts will be to help my customers understand that taking the pictures is only half of the process of hiring a custom photographer. When I get together with a family to take their pictures my job is only half way done.
The other day I was looking at some images with a client and she asked me "what would you do to that image, it looks fine to me." What a great question!
So I am going to give you a little look into what I do to standard portrait image to make it shine. The first thing I do is to crop the image to make sure it is composed the way I want it. This one was pretty straight forward. For this image I wanted to make sure my son was the hightlight. So I lightened him up and darkened the edges. Therefore, the viewers eye is drawn to Bodie, representin' for the Raida's!!! Although, his skin is pretty buttery to begin with I did smooth out his skin slightly. I sharpened the overall image to ensure he was in focus.
So I am going to give you a little look into what I do to standard portrait image to make it shine. The first thing I do is to crop the image to make sure it is composed the way I want it. This one was pretty straight forward. For this image I wanted to make sure my son was the hightlight. So I lightened him up and darkened the edges. Therefore, the viewers eye is drawn to Bodie, representin' for the Raida's!!! Although, his skin is pretty buttery to begin with I did smooth out his skin slightly. I sharpened the overall image to ensure he was in focus.
All of this my not make sense to most of you, however, the images don't come out of my camera done. It is like cookie dough it is good as dough but when you put it in the oven and bake it turns into something better!
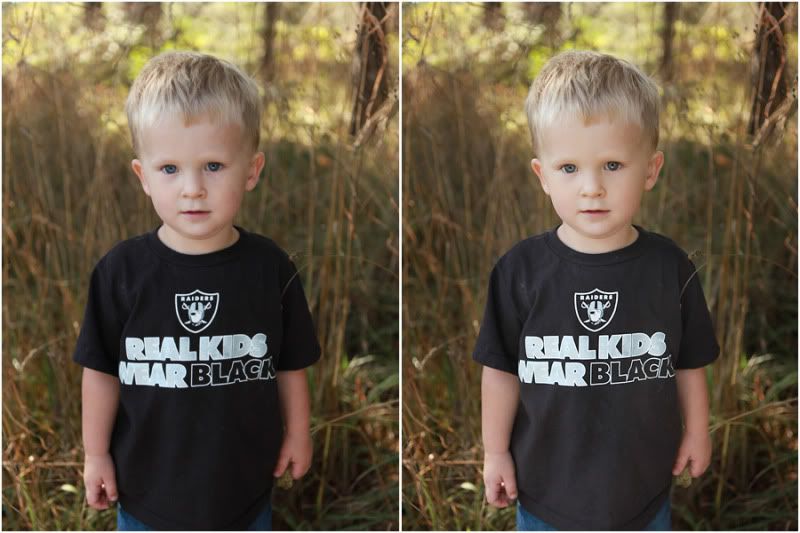
Fun to see the before and after. What a handsome boy.
ReplyDelete